

Homestead
Radon Test Kit: A How-To Review
Oct
Do you remember life before radon testing? Well, I don’t and I’m not sure I want to.
Radon is a gas that occurs naturally from the decay of uranium in rocks, soil, and water. It gets into homes through openings in structures that extend below the surface. In most cases that’s the basement but it could also be pipes. There are no warning signs at all. You can’t see it, smell it, or taste it.
Unfortunately, it’s also super common. About one in 15 houses in the United States has elevated levels that are potentially unsafe. It’s important to check for radon because it’s harmful to humans. It can damage lung tissue and is a known carcinogen. If you find a problem, the good news is that there are mitigation systems you can have installed to prevent the concentration of gas indoors.
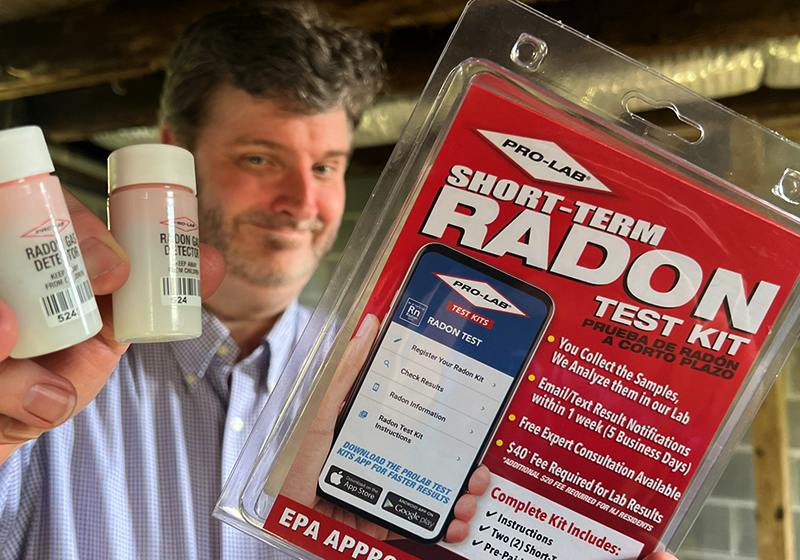
PRO-LAB SHORT-TERM RADON TEST KIT
PRO-LAB has an easy way to assess your radon risk. Their kit includes a pair of radon detectors, a small plastic bag, a submission form, and a return envelope. That’s it.
The two most important parameters for getting a good measurement are distance and time. Pay close attention to both. Pro tip: Always start your clock at the top of the hour. For instance, it’s easier for everyone to remember that a particular area will be closed off from 8 p.m. on a Sunday to 8 a.m. on a Wednesday to run the test. It will also simplify noting the start and stop times of your test’s timeframe.
PREP FOR THE TEST
The first requirement is to establish “closed house conditions.” I like to do this the night before. All windows and doors have to be shut for 12 hours before detection begins. It’s okay to run HVAC systems but window shaker air conditioners are only permitted if the vent is closed, or the unit is set to recycle mode. It’s also fine to go in and out of the room during this time. Just don’t leave the door hanging open, letting all that fresh air dilute your radon.
You also need a platform that is at least two feet off the floor and three feet away from the exterior walls. Since I was testing an unfinished basement in an abandoned house, I should have thought about this the day before. The distance from the walls was easy but I ended up having to scavenge a bucket and a cinder block to get the correct height. The platform also must be wide enough to place the detectors six inches apart. I definitely recommend confirming these measurements before or during the closed house conditions so you can roll right into the testing phase at the 12-hour mark.
START TESTING
I don’t like paperwork. I’m an action guy. But for this test I forced myself to have the form standing by before uncapping the detectors. That way I was ready to record the exact start date and time, which is vital. The lab uses the length of time, down to the minute, that the detectors were exposed to the air to make an accurate calculation of the amount of radon that’s present.
I rechecked the detectors to confirm they were six inches apart, uncapped them, and recorded the start date and time. I put the caps and the other items back in the packaging and left them there so they wouldn’t get lost. Then I closed up the room and left.
STOP TESTING
The detectors have to be open and undisturbed for at least 48 hours and no more than 96 hours, or the test is invalid. I capped my detectors at exactly 72 hours and recorded the end date and time on the form. I firmly tightened the caps so they wouldn’t come off during shipping and contaminate the results.
SUBMITTING THE SAMPLE
Mailing the sample is a two-step process. Step one: register the kit. I decided to download the app, which is easy to use, but you can also go to their website ProLabInc.com. Along with contact info, they need to know the serial numbers on the detectors, the testing dates with exact start and stop times, where the testing was done (address plus the area of the building), and why it was done. Once I entered that in, computer gremlins spit out an online registration number.
Step two: Connect the digital record with the physical samples by filling out the card that comes with the kit. It basically duplicates the information that’s submitted digitally. I added a form of payment, placed the detectors in the small plastic bag, and put everything into the self-addressed envelope that PRO-LAB provided.
THE RESULTS
Okay, nerd time. I sent the samples off on August 31st, requesting their standard processing time. On September 3rd, I got an email from PRO-LAB that said they’d received the sample. Five days later I got the results. They were all really simple and they fit on a single page.
PRO-LAB measures radon in picocuries per liter (pCi/L). Also, for my fellow science nerds, they use the scintillation method to generate a radon score. The EPA tells us that the average radon level in homes in America is 1.3 pCi/L. They recommend looking into repairs and/or investing in mitigation systems if a level of 4.0 pCi/L or higher is detected.
That all being said, here are my results. Sample one came in at 1.1 pCi/L and sample two came in at 0.7 pCi/L, for an average of 0.9 pCi/L. That’s not bad. It’s a little under the national average. I was kind of hoping for something closer to zero, but it could be much worse. There are areas in Pennsylvania where the geology produces readings between 10 and 120 pCi/L. Yeah, things can always be worse. Always.
WRAP-UP
At 0.9 pCi/L, I have a general sense that the soil underneath the slab isn’t going to be a problem. Radon can fluctuate depending on the season and I might decide to test at other times of the year just to make sure there are no spikes.
This house has another potential source of radon, a new well that reaches 300 feet into the ground. Wells create an additional risk because the gas can get into the house through the faucets when the water is running. And guess what? PRO-LAB makes a radon in water kit as well. Of course they do. I’ll probably be taking that on a test drive in a future episode when we finish our plumbing.
In addition to the test results and describing the dangers of radon, the PRO-LAB report includes resources for figuring out mitigation processes. There are lots of engineered solutions like foundation ventilation that are quite effective at reducing radon when elevated levels are found.
Testing for radon is quick and easy, and I’m giving this kit a thumbs up. Until next time, stay safe. Be prepared and I’ll see you soon.