

Homestead
Mold Test Kit: A How-To Review
Nov
Our adventure today brings us to an unfinished basement in a very old house. We are on the hunt for mold.
This home’s main structure was built over 200 years ago, around the same time President Washington was getting a new executive mansion framed up on the Potomac River. But the basement is modern, dating from the first term of the 44th president, Barack Obama. So we’re dealing with a mix of time periods and construction materials, not to mention a leaky foundation. These details are important because we need to understand where mold might be growing and why.
Under the right conditions, allergenic, pathogenic, and even toxic strains that sneak into buildings as microscopic spores can take hold and explode into a hazardous alien colony.
Mold is everywhere. Under the right conditions, allergenic, pathogenic, and even toxic strains that sneak into buildings as microscopic spores can take hold and explode into a hazardous alien colony. All they need is a bed of organic material and a continuous supply of moisture and oxygen. Because this basement is under construction, we can focus on prevention. Managing mold before you move in is vastly superior to the alternative. It keeps everyone healthy and avoids more expensive fixes down the road.
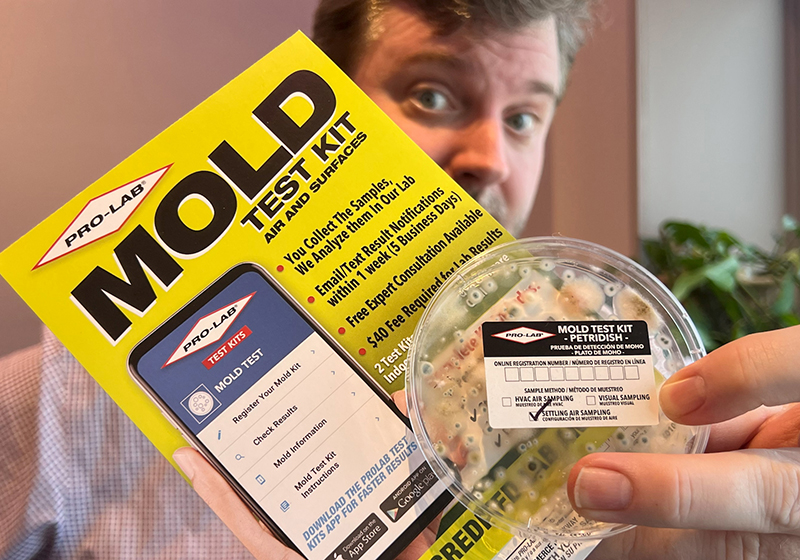
PRO-LAB MOLD TEST KIT
I like PRO-LAB test kits. They’re simple to deploy and the results come back fast. Their mold kit includes three methods to collect a sample—bulk material, swab, and settled air—so you can choose the procedure that’s the best match for your situation.
Collecting bulk material is the easiest method. Just like it sounds, a sample scrap with obvious mold goes into the bag and the whole thing gets mailed to the lab. That’s it.
The other two require petri dish prep (see TAKING THE SAMPLE below) and need a couple of days to see if any spores settle in and grow. The sterile swabs are for visual sampling. In areas where there’s discoloration, the first step is to drag a swab over the suspicious patch. Then a gentle swipe across the growth medium will transfer spores to the dish. Settled air can be done by leaving the petri dish open in a sealed room for an hour to capture airborne mold. Or, to test an HVAC system, the petri dish can be taped to an exhaust vent for 10 minutes.
For any of the methods involving the petri dish, there is a time commitment. You need an hour for prep and anywhere from a few minutes to an hour to collect the sample. You also have to be around to monitor potential mold growth for 48 to 96 hours. Make sure you’ll be available to complete the entire process before you start.
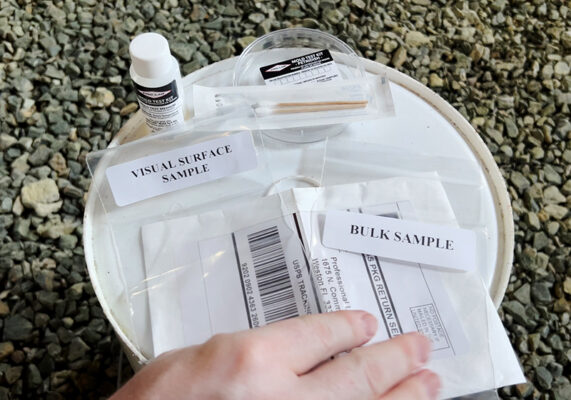
TAKING THE SAMPLE
Because there wasn’t any visible mold in the basement, I used the settled air method. This required two hours on the day of the test, and another two and a half days of checking the dish to see if any mold was growing.
To prep the petri dish, I had to start by making a level surface, which is important for the process. This might not be an issue in a finished space where there’s probably a table nearby, but my basement location is currently all gravel. I found a bucket and used a two-foot level to confirm it was flat. Then I poured the growth medium into the bottom half, tilting the dish around so the liquid spread evenly. I put the lid on and placed the petri dish on the bucket. It needed one hour to gel. I set an alarm, always a good idea, so I didn’t forget to come back.
After an hour elapsed, I checked the growth medium to make sure it had firmed up and wasn’t flowing around anymore. I put the dish back on the bucket, removed the lid, and closed up the room so the air wouldn’t be disturbed. Then I gave it an hour, as directed, to gather whatever little goobers it was going to have. At the end of the sampling time, I went back in and capped off the petri dish.
The cover was pretty loose so I decided to use electrical tape to seal the edges. That protected my sample and prevented other contaminants from getting in. Then I had to wait. My first official check would be in 48 hours. If needed, I’d look at it again in 72 or 96 hours in case there were really slow-growing mold strains.
SUBMITTING THE SAMPLE
At 38 hours, my sample still looked surprisingly clear. But then things started to change. 68 hours in, there were fuzzy blooms in different colors all over the growth medium. I knew I needed to get that mess to the lab to figure out what was going on before continuing work on the basement.
Mailing the sample is a two-step process. Step one: Register the kit. I decided to download the app, which is easy to use, but you can also go to their website ProLabInc.com. Along with contact info, they need to know when the sample was taken, where it was taken, and how it was taken. Once I entered that in, computer gremlins spit out an online registration number.
Step two: Connect the digital record with the physical sample by filling out the card that comes with the kit. I put the online registration ID on the top of the card and on the petri dish. I duplicated the information requested by the app, added a form of payment, and put everything into the self-addressed envelope that PRO-LAB provided.
THE RESULTS
I sent the sample off on August 28th, requesting their standard processing time. One week later, a nice email arrived from PRO-LAB saying that they’d received the sample and that results would be delivered in six days. Well, I got them in five days and it turns out that we had quite the mold party going on.
The sample contained four strains: cladosporium, epicoccum, non-sporulating fungi, and penicillium. You’re probably wondering, what does that mean? Fortunately, they include a comprehensive chart that lists each mold with its outdoor habitat, indoor habitat (what they grow on, like wallboard or wood), potential health risks, and some general comments. Overall, these are some very common types of mold that aren’t really dangerous. But for people who are allergic, they could potentially trigger hay fever and asthma.
The rest of the report had general information about the nature of mold, causes like humidity and water leak issues, procedures for mold mitigation, and other resources for more information.
preventing mold
Meanwhile, here is some quality SandViking advice—for entertainment purposes only—if you want to kill your mold problem. Step one: Seal up any leaks or water sources. Step two: Get a high-quality dehumidifier with digital humidity controls and a hose output. Then set the unit to 40% humidity (or lower) and let it rip. You’ll immediately start pulling gallons and gallons of water out of the air, and that’s a very good thing!
The whole key to this plan is making sure that your dehumidifier runs continuously, extracting water from the air until it hits that magic number. I’m recommending that you get the GE Energy Star portable dehumidifier. One feature of this model that’s really nice is the pump for the condensate (which is fancy word for the water that was removed from the air). Just set it up so the hose empties into a drain (floor drain, shower drain, utility sink drain, etc.) and the mold is going to die. In a short timeframe, those moldy, musty odors will disappear.
For maintenance, you’ll just need to wipe things down with a good sanitizer and continue to run your dehumidifier to keep that air dry. Now, obviously, you have to take care of any leaks. Because, if not, it is just a perpetual source of moisture, and you’ll never win that battle.
WRAP-UP
And that’s it. PRO-LAB’s Mold Test Kit gets a SandViking thumbs up. The bottom line is that it’s impossible to keep microscopic mold spores out of your home. They only need a little bit of organic material, some moisture and oxygen to thrive. So get one of these kits. If you’re breathing the air, you want to know if bad mold is there.